What Is Thai Ginger Chicken?
Thai ginger chicken, Gai Pad Khing (ไก่ผัดขิง), is a stir-fry of chicken and fresh ginger in a savory sauce of oyster sauce, fish sauce, and soy sauce, finished with onion, bell pepper, and cilantro. It is made fast in a hot wok. The ginger is not a background flavor. It is the whole point of the dish.
Note From Susie

Sawasdee Kha, and Hello.
She made it in our kitchen in Maryland, a house where the smell of ginger and garlic and chicken would move through every room the moment the wok got hot. I knew the smell before I knew the dish. I knew it was hers before I understood what made it hers.
When I was young I was not sure about ginger. It was present in a way that other flavors were not, sharp and warm and slightly insistent. My mother never pushed it on me. She made it because she loved it. She ate it at that kitchen table the way she ate everything she loved: without apology, without explanation.
By the time I was a teenager something had shifted. The ginger that had seemed too much was suddenly exactly right. The warmth of it against the chicken, the way it softened slightly in the wok without losing what it was, I started to understand what she had always known. This was a dish built around one flavor. If you did not like ginger you would not like this dish. If you did, there was nothing better.
She was right. She usually was.

What’s In This Page
“This was my mother’s dish first.”
— Her Hands His EyesWhat Is Thai Ginger Chicken?
Thai ginger chicken, ไก่ผัดขิง, Gai Pad Khing, is a classic Thai stir-fry built entirely around the flavor of fresh ginger. Sliced chicken is cooked over high heat with julienned fresh ginger, onion, and bell pepper in a sauce of oyster sauce, fish sauce, soy sauce, and a touch of sugar. The dish is simple in its structure and direct in its intention: the ginger is not a background note, not a supporting flavor. It is what the dish is about.
Gai Pad Khing is found across Thailand, in home kitchens, at street food stalls, and on the menus of Thai restaurants worldwide. It is considered a comfort dish: fast to make, satisfying, built around ingredients that are almost always available. What separates an authentic Thai ginger chicken recipe from a Western approximation is the amount of ginger, more than seems reasonable to an unfamiliar hand, and the quality of the wok heat. The ginger needs enough heat to soften at the edges while keeping its sharpness at the center. Low heat produces something stewed. High heat produces something alive.
According to the Oxford Companion to Food, ginger has been central to Southeast Asian cooking for thousands of years, used as much for its medicinal warmth as for its culinary depth. In Thai cooking it appears in soups, curries, stir-fries, and marinades, but nowhere more directly than in Gai Pad Khing, where it is the name and the point.
The smell of it fills every room. That has always been true.
What You’ll Need
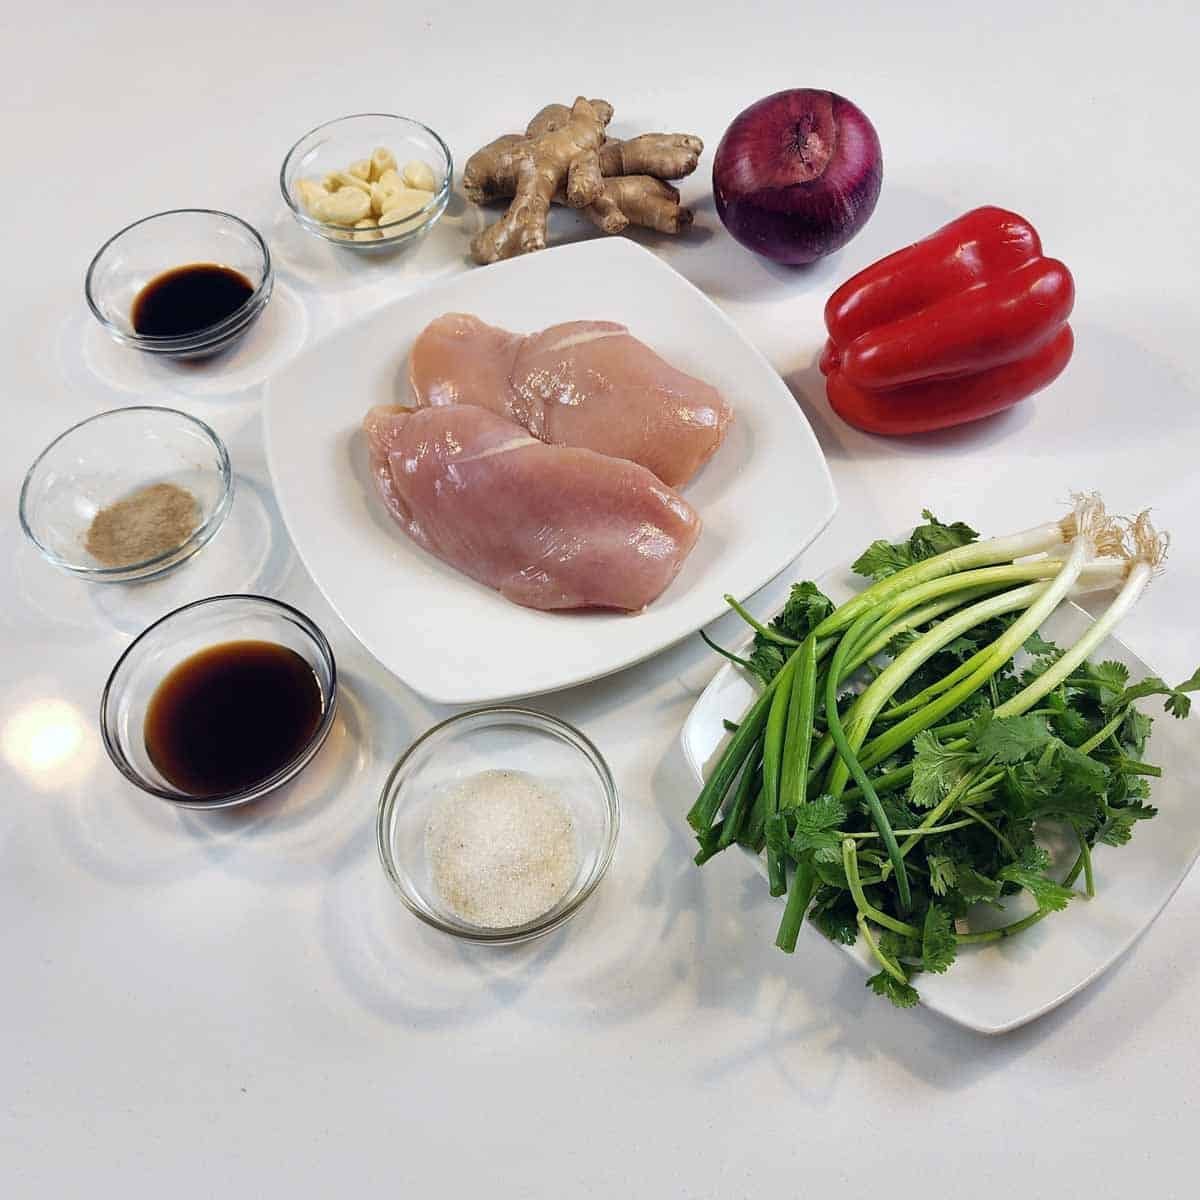
Chicken breast, one pound, thinly sliced. The recipe uses breast meat sliced thin so it cooks through quickly in the hot wok. Wood ear mushrooms, also called black fungus or cloud ear fungus, your choice. Cut it evenly, roughly three-quarter inch pieces, and pull it from the heat the moment the pink is gone.
Fresh ginger, two tablespoons julienned, cut into thin matchstick pieces. Not minced. Not grated. Julienned ginger softens slightly in the wok while keeping a texture you can find in the finished dish. That texture is part of what Thai ginger chicken is. Use more than seems right. Two thumb-sized pieces for four servings is the starting point.
Garlic, three cloves, minced fine. One onion, thinly sliced. One bell pepper, any color, thinly sliced. These provide sweetness, color, and body alongside the ginger.
The sauce is built before the wok gets hot: soy sauce and oyster sauce for depth and savory sweetness, white pepper for warmth, sugar for balance. Mix everything together in a small bowl and have it ready to pour as one motion.
Two tablespoons of vegetable oil. Fresh cilantro leaves for garnish. Steamed jasmine rice alongside, always.
VISUAL WALK THROUGH
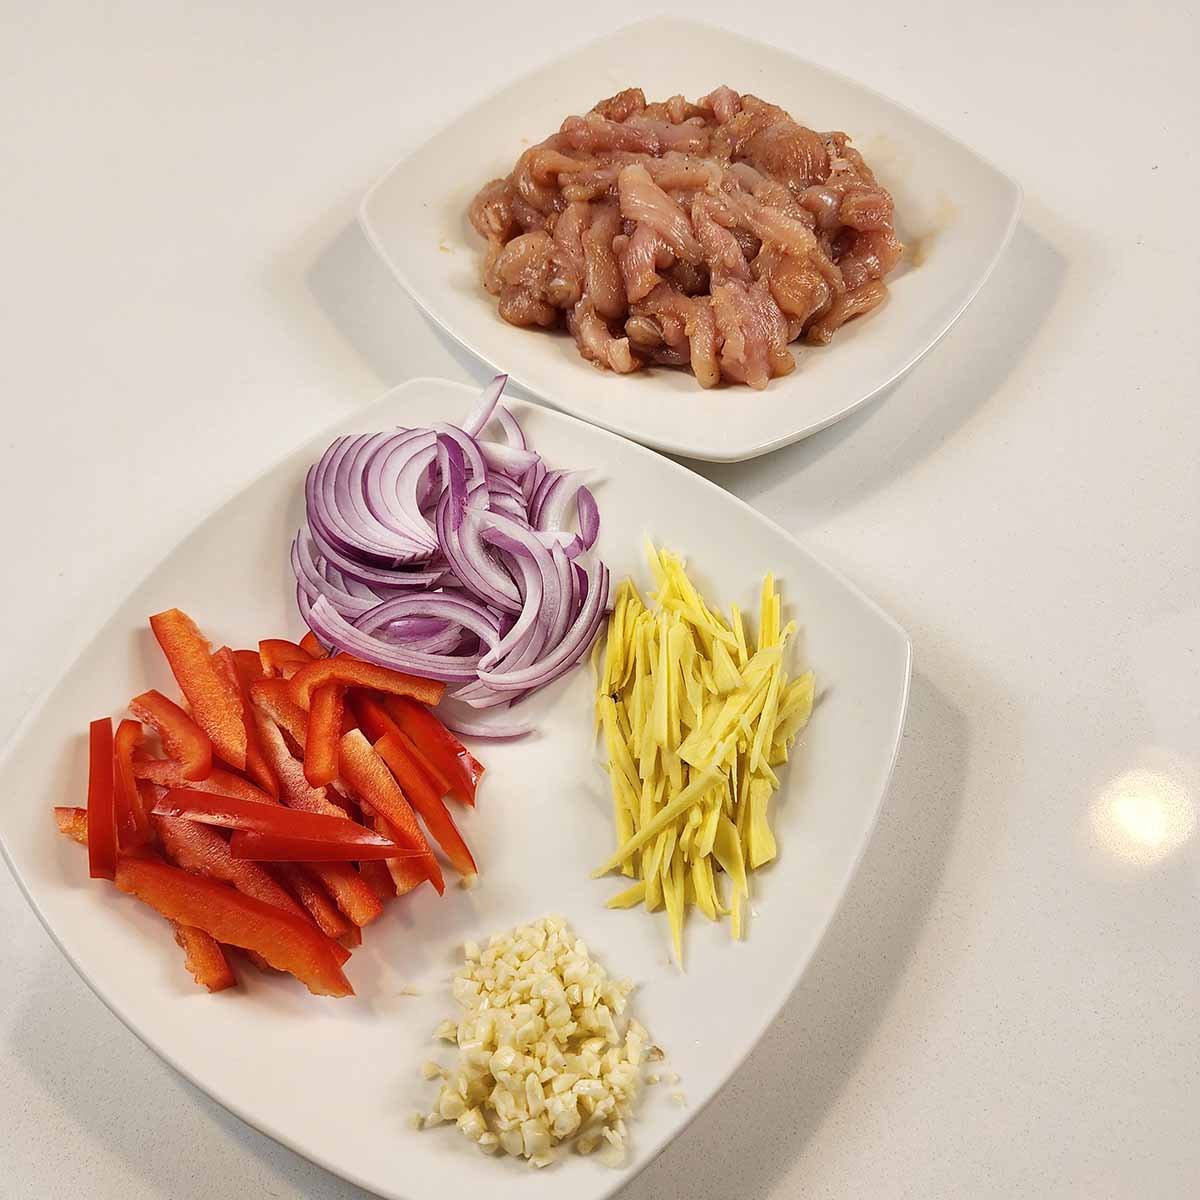
Step 1. Prepare all ingredients before the wok gets hot.
Prepare everything before the wok gets hot. Slice the chicken breast into thin strips for even cooking. Mince the garlic finely. Julienne the fresh ginger into thin matchstick-sized pieces. Slice the onion and bell pepper thinly. Mix the soy sauce, oyster sauce, white pepper, and sugar in a small bowl. Have everything within reach of the wok before the heat goes on. Thai ginger chicken moves from cold to plate in under fifteen minutes. There is no time to prepare ingredients once the cooking starts.
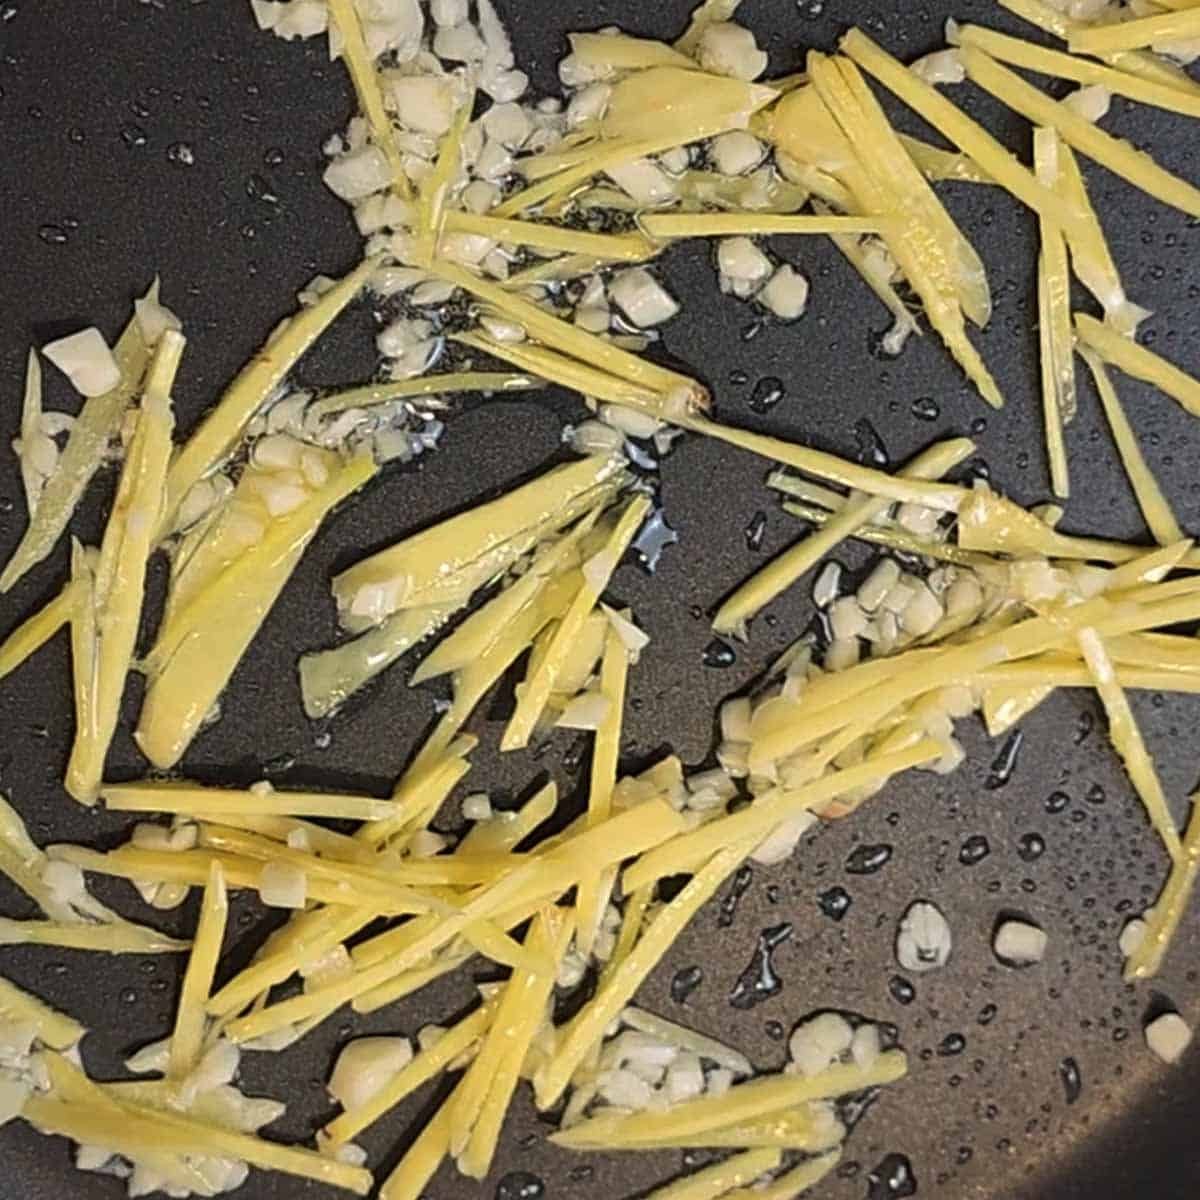
Step 2. Sauté the garlic and ginger first.
Heat vegetable oil in a large skillet or wok over medium-high heat until shimmering. Add the minced garlic and julienned ginger. Stir constantly for about thirty seconds until they become fragrant. The kitchen will fill immediately with the smell.
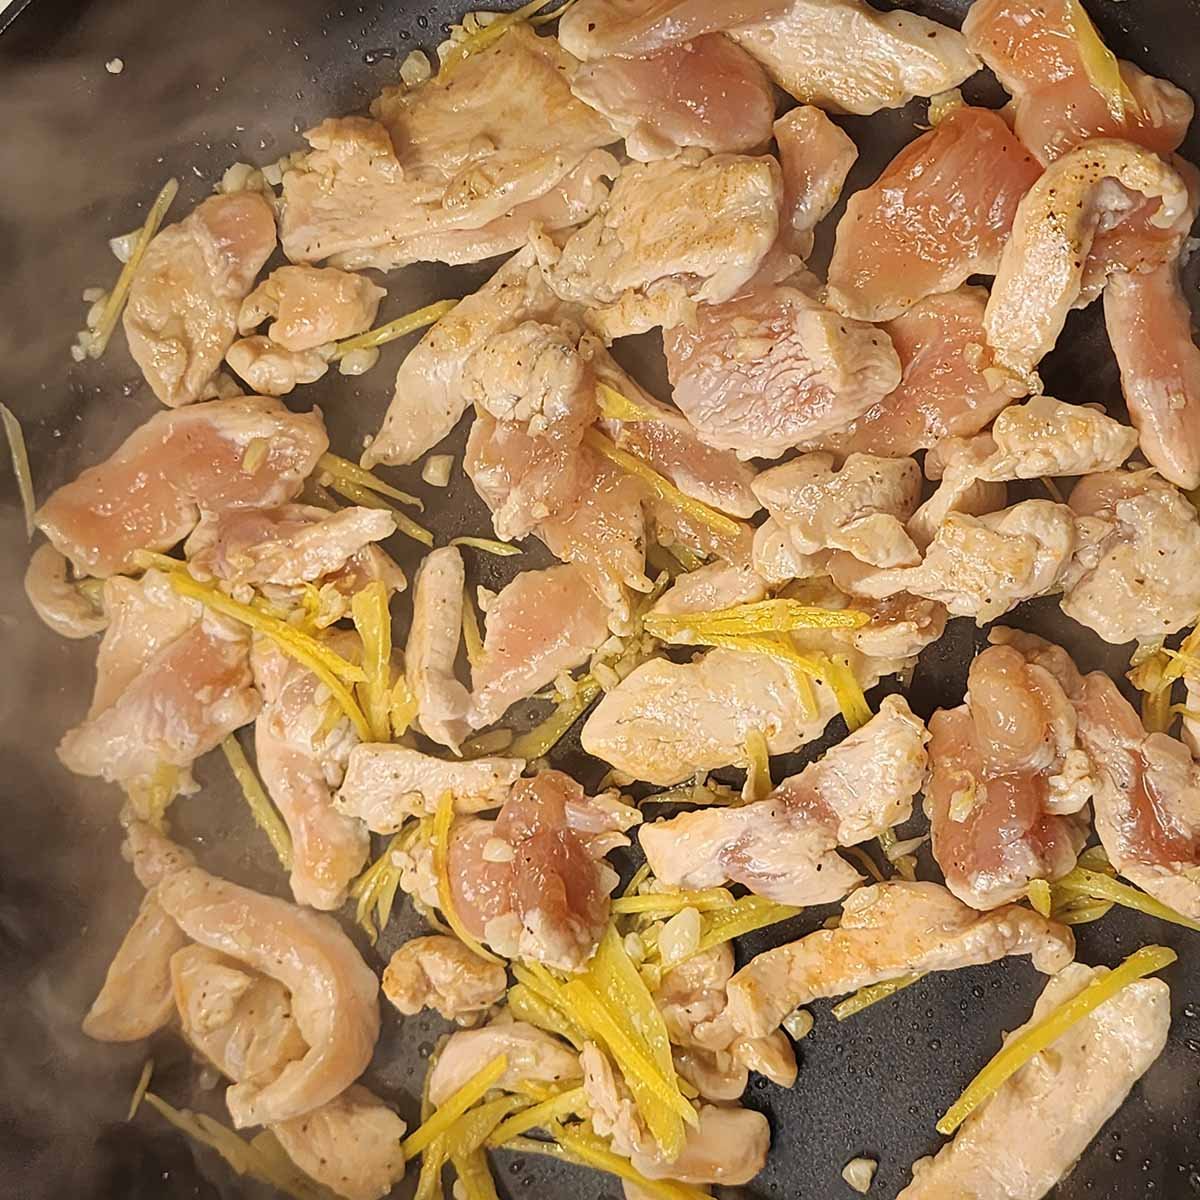
★ Step 3. Cook the chicken over high heat. This is What Makes the Difference.
Add the sliced chicken breast to the skillet, spreading it out evenly. Do not stir immediately. Let the chicken sit in contact with the hot wok for thirty seconds. This develops color on the outside rather than steaming the meat gray. Then stir. Stir-fry the chicken for five to seven minutes, stirring frequently to ensure all sides are cooked and no longer pink. Adjust the heat as needed to maintain a steady sizzle.
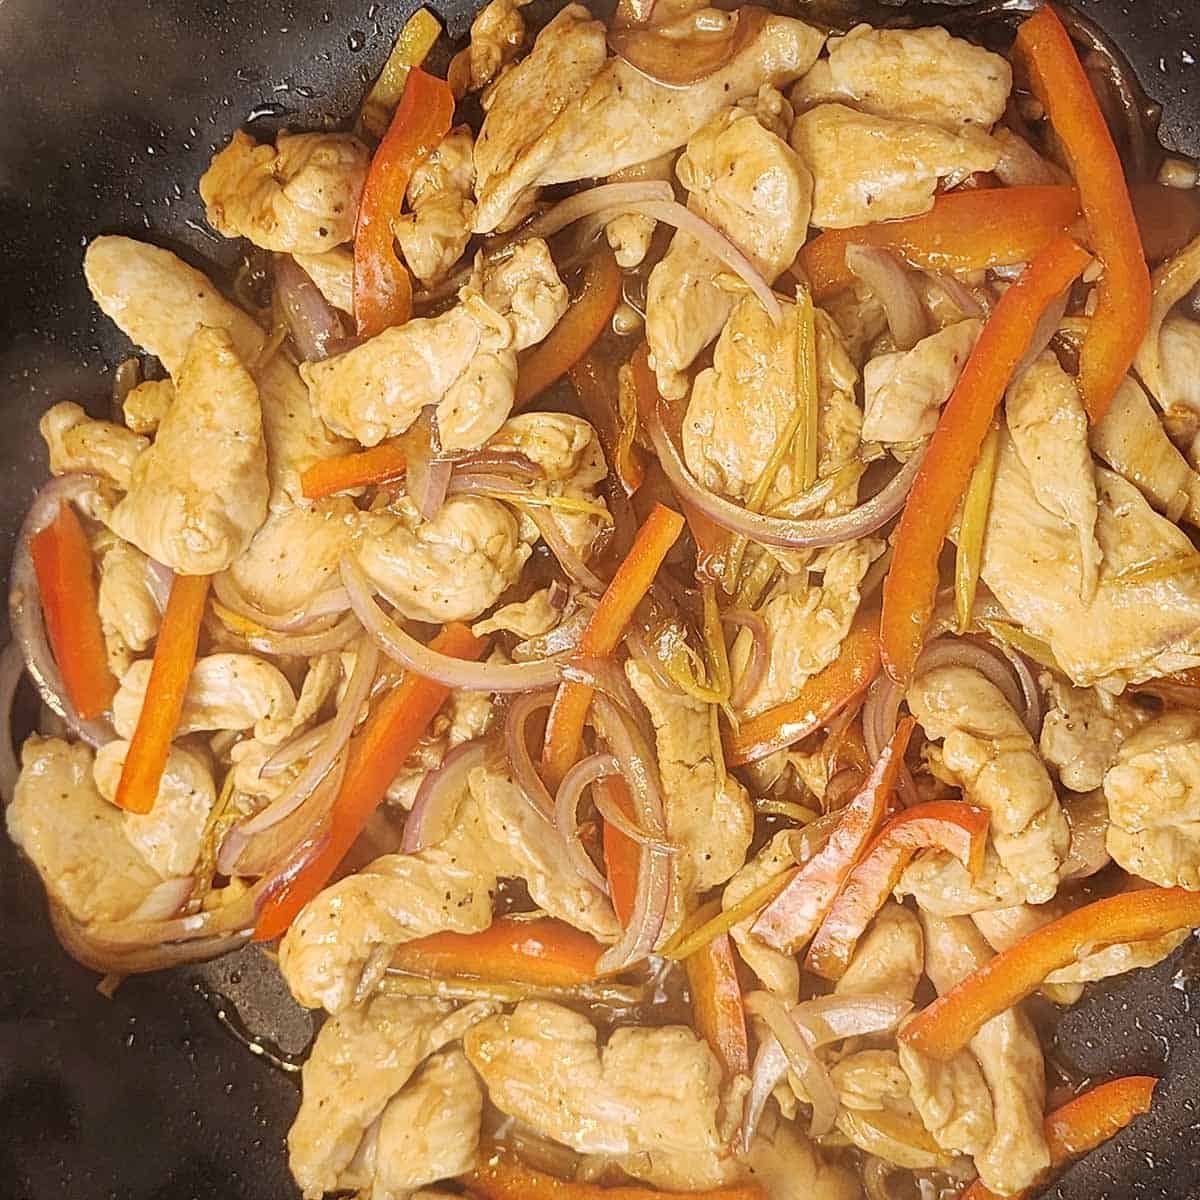
Step 4. Add the vegetables and the sauce.
Add the sliced onion and bell pepper to the skillet with the cooked chicken. Continue stir-frying for three to four minutes until the vegetables reach a tender-crisp texture. Pour the soy sauce, oyster sauce, and sugar over the stir-fried mixture. Stir well to combine, coating all ingredients thoroughly with the savory-sweet sauce. Allow the dish to simmer for two to three minutes.
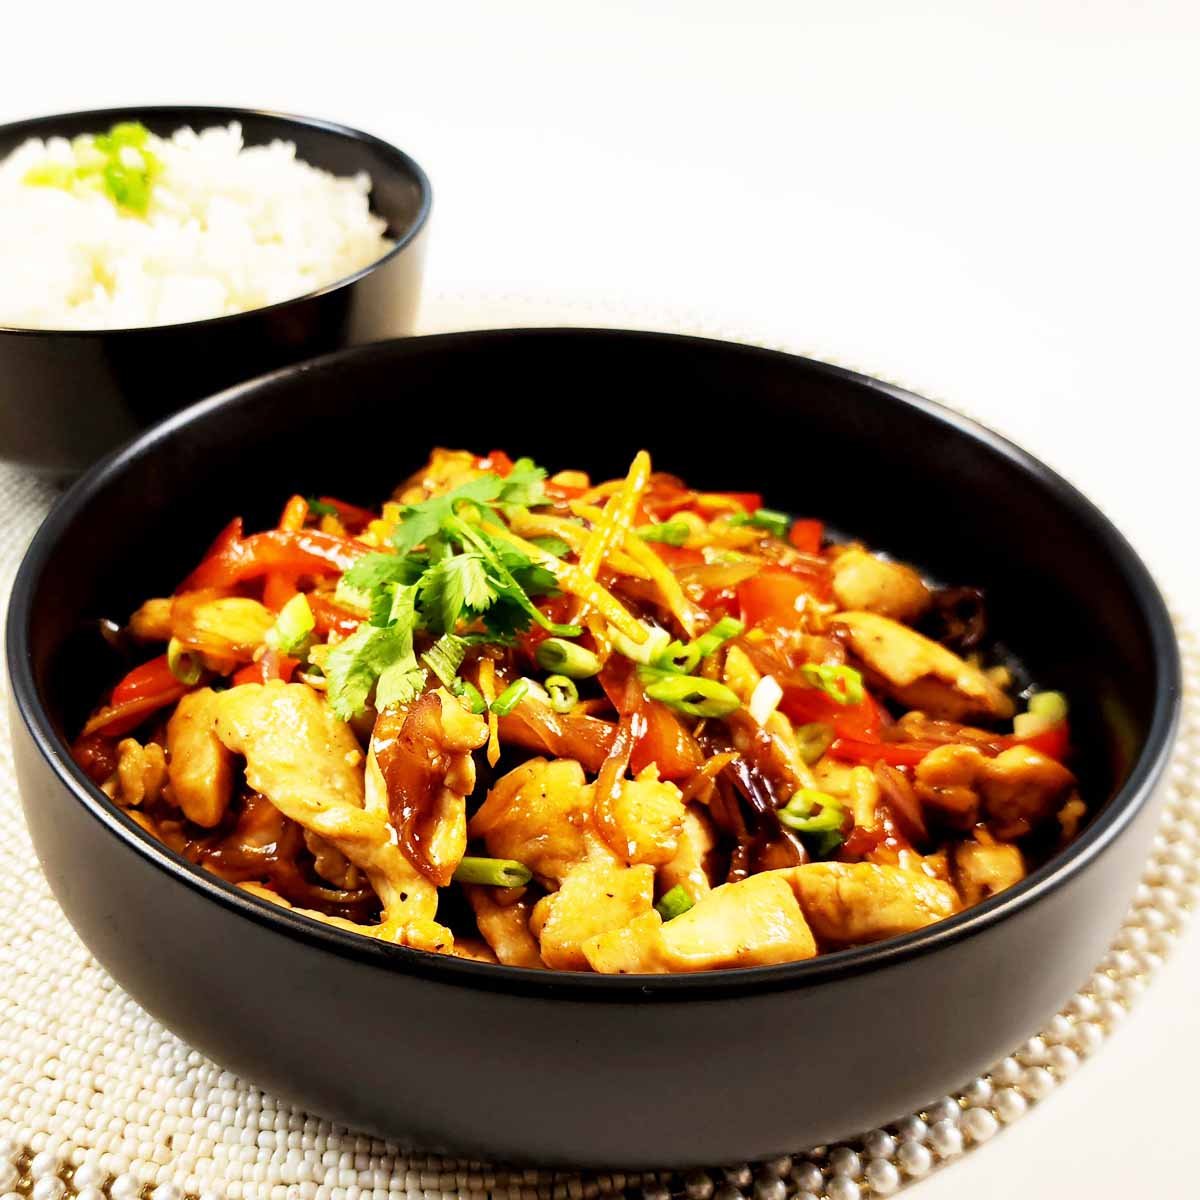
Step 5. Serve over rice with fresh cilantro.
Transfer the Thai ginger chicken to a serving platter or individual plates. Serve hot over steamed jasmine rice. Garnish generously with fresh cilantro leaves.

Thai Ginger Chicken (Gai Pad Khing)
Ingredients
- 1 lb chicken breast thinly sliced
- 2 tbsp vegetable oil
- 3 cloves garlic minced
- 2 tbsp fresh ginger julienned
- 1 onion thinly sliced
- 1 bell pepper any color, thinly sliced
- 1 cup mushrooms (optional)
- 2 tbsp soy sauce
- 1 tbsp oyster sauce
- 1 tsp white pepper
- 1 tsp sugar
- Steamed jasmine rice for serving
- Fresh cilantro leaves for garnish
Instructions
Prepare Ingredients:
- Slice the chicken breast into thin strips . Mince the garlic, julienne the fresh ginger into thin matchstick-sized pieces, slice the onion and bell pepper thinly .
Sauté Aromatics:
- Heat vegetable oil in a large skillet or wok over medium high heat until shimmering. Add the garlic and ginger, stirring constantly for about 30 seconds or until they become fragrant.
Cook Chicken:
- Add the sliced chicken breast to the skillet, spreading it out evenly. Sear for 30 seconds, Stir-fry the chicken strips for 5-7 minutes, stirring frequently to ensure all sides are cooked and no longer pink. Adjust the heat as needed to prevent burning.
Add Vegetables:
- Add the sliced onion and bell pepper into the skillet with the cooked chicken. Continue stir-frying for 3-4 minutes or until the vegetables reach a tender-crisp texture.
Seasoning:
- Pour the soy sauce, oyster sauce, and sugar over the stir-fried mixture. Stir well to combine, coating all ingredients thoroughly with the savory-sweet sauce. Allow the dish to simmer for 2-3 minutes.
Serve:
- Transfer the Thai Ginger Chicken (Gai Pad Khing) to a serving platter or individual plates. Serve the dish hot over steamed jasmine rice, garnish with fresh cilantro leaves.
Video
Notes
Nutrition
LET’S GET THIS RIGHT
Why does my Thai ginger chicken taste mild when it should taste like ginger?
Not enough ginger, or it was minced instead of julienned. Minced ginger disperses into the sauce and the flavor becomes background. Julienned ginger stays present in the dish as something you can find and taste. Use at least two thumb-sized pieces of fresh ginger per four servings, cut into thin matchsticks. Taste the raw ginger before it goes into the dish. If it does not taste sharp and warm and slightly spicy, it is old. Fresh ginger has a brightness that older ginger loses.
Can I use ground ginger instead of fresh ginger for Thai ginger chicken?
Do not use ground ginger. This is one recipe where the substitution fundamentally changes the dish. Ground ginger is a spice that adds warmth to baked goods. Fresh ginger is an aromatic that adds sharpness, texture, and a complexity that the dried version cannot replicate. Thai ginger chicken is built on fresh ginger. Without it, you have a different dish with a similar name.
Why is my Thai ginger chicken watery instead of glossy?
The wok heat was too low, or there was too much liquid in the pan. A proper stir-fry requires high heat that reduces the sauce quickly as it hits the pan. Low heat allows the chicken to release its moisture, which thins the sauce before it can reduce and cling. Make sure the wok is genuinely hot before the chicken goes in, and keep the heat high through the entire cooking process.
What mushrooms work best in Thai ginger chicken?
Wood ear mushrooms are traditional, their slightly chewy texture and neutral flavor carry the ginger and sauce without competing. Dried wood ear mushrooms need twenty minutes of soaking in warm water before they go into the wok. Fresh shiitake mushrooms are an excellent substitute. Button mushrooms work but produce a softer, less interesting texture.
What does Thai ginger chicken taste like?
Thai ginger chicken tastes like ginger first, warm, sharp, slightly spicy, present in every bite. Behind it is the savory depth of the oyster sauce and fish sauce, the slight sweetness of the sugar balancing the salt. The chicken is tender, the vegetables slightly crisp, the cilantro bright at the finish. It is a dish that is direct and clear in its flavor. There is no mystery about what it is or what it is trying to be.
FLAVOR PROFILE
The smell comes first. Ginger and garlic hitting hot oil, it fills the room before the dish has even started, sharp and warm and insistent in a way that other aromatics are not. It moved through the Maryland kitchen and into every other room. It still does.
Then the chicken goes in and the smell deepens. The savory weight of the meat joining the ginger, the oyster sauce hitting the hot wok and caramelizing at the edges. The bell pepper and onion add their sweetness, the cilantro at the end bringing something lighter and brighter, cutting through the richness for just a moment before settling into it.
On the plate the dish is glossy. The sauce reduced and clinging, the ginger visible in its matchstick pieces throughout. The first bite is savory and then the ginger arrives, warm and sharp, present in a way that asks you to pay attention. Not aggressive. Not overwhelming. Present. The way a flavor is present when it is the whole point of the dish.
My mother ate this with rice and with the certainty of someone who knew exactly what she liked. By the time I was a teenager I understood what she meant. The ginger that had seemed too much was suddenly exactly what the dish needed.
SUSIE’S KITCHEN NOTES
My mother peeled the ginger with the edge of a spoon rather than a peeler. The skin of fresh ginger is thin enough that a spoon scrapes it cleanly without removing the flesh underneath. A peeler takes too much. Scrape along the length of the root with the spoon’s edge. It takes thirty seconds and wastes nothing. Then julienne: cut the peeled ginger into thin rounds first, stack the rounds, and cut through the stack into thin matchsticks. Consistent thickness means consistent cooking.
The wok temperature is what separates a stir-fry from a braise. A wok that is not hot enough will cause the chicken to release liquid as it cooks, that liquid lowers the temperature further, and the dish begins to steam rather than fry. Get the wok hot, hot enough that the oil shimmers before the garlic and ginger go in. Then keep it there.
My mother made this over a gas burner that she had used for years and trusted completely. She knew exactly what high heat looked like on that particular stove. If you are less certain, err toward higher rather than lower. The dish can recover from brief excess heat. It cannot recover from not enough.
The cilantro goes on after the plate is ready, not before. It does not cook in the wok. It sits on top, fresh and bright, the last thing you see before the first bite. Do not skip it. It is not decoration. It is the brightness that finishes the dish.
PAIRING SUGGESTIONS
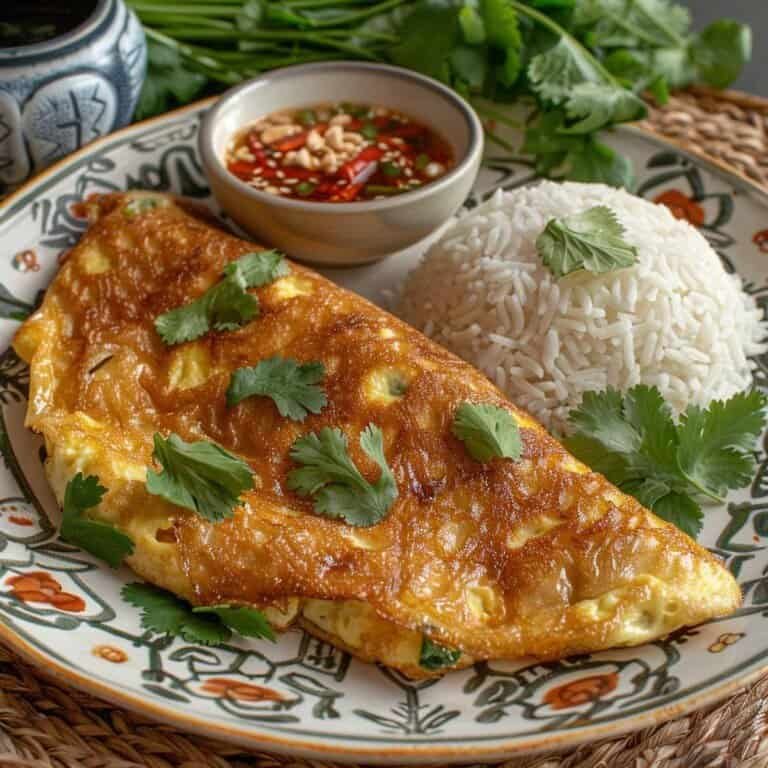
Thai ginger chicken belongs over jasmine rice, the clean, separate grains absorbing the glossy sauce without disappearing into it. Thai ginger chicken pairs well with dishes that balance its directness without competing, the Tom Kha Gai brings coconut and lemongrass alongside, warm and aromatic in a different register, quieter than the ginger chicken but present in its own way. The Thai omelet is the simpler companion, eggs and fish sauce alongside ginger and chicken, the two dishes together making a complete table from very little. For a spread that moves across flavors and textures, the Green Papaya Salad cuts through the richness of the ginger chicken with its tartness and cold crunch. My mother made Thai ginger chicken because she loved it. She put it on the table and the house smelled like home.
FAQ
What is Thai ginger chicken (Gai Pad Khing)?
Thai ginger chicken, Gai Pad Khing (ไก่ผัดขิง), is a Thai stir-fry of chicken, fresh julienned ginger, onion, and bell pepper in a savory sauce of oyster sauce, fish sauce, soy sauce, and sugar. It is cooked fast in a very hot wok and served over jasmine rice with fresh cilantro. The ginger is the central flavor of the dish, present, warm, and sharp in every bite. It is one of the most common home-cooked Thai dishes.
How do you make Thai ginger chicken step by step?
Julienne fresh ginger into thin matchsticks. Slice the chicken thinly. Mix the sauce, soy sauce, oyster sauce, white pepper, and sugar in a bowl before cooking. Heat oil in a large wok or skillet over medium-high heat until shimmering. Add garlic and ginger and stir for thirty seconds until fragrant. Add chicken and stir-fry for five to seven minutes until cooked through. Add sliced onion and bell pepper and stir-fry three to four minutes until tender-crisp. Pour in the pre-mixed sauce, stir to coat, and simmer two to three minutes. Serve immediately over jasmine rice garnished with fresh cilantro.
How much ginger should I use in Thai ginger chicken?
More than most recipes suggest. Two tablespoons of julienned fresh ginger for four servings is the starting point for an authentic Thai ginger chicken recipe. The ginger should be present and findable in every bite. If you can taste the sauce more than the ginger, there is not enough ginger. This is a dish named for the ginger. It should taste like it.
What is the difference between Thai ginger chicken and regular ginger chicken?
Thai ginger chicken uses fish sauce and oyster sauce as the sauce base, which gives it a deeper, more complex savory quality than Chinese-style ginger chicken dishes. The amount of fresh ginger is significantly higher. The dish is cooked at high heat in a wok without any cornstarch thickener, the sauce reduces and clings naturally. The result is bolder, more direct, and more clearly built around the ginger’s flavor.
Can I make Thai ginger chicken with chicken breast instead of thighs?
Yes. The recipe uses chicken breast sliced thinly. If using breast meat, cut it to a consistent size and pull it off the heat the moment the pink is gone. Breast meat tightens quickly at high wok heat and will become dry if cooked even slightly too long. Thigh meat has more fat, stays tender longer, and produces a richer result in a fast stir-fry if you prefer it.
Is Thai ginger chicken spicy?
Thai ginger chicken has a warm heat from the fresh ginger and white pepper rather than a chili heat. The ginger produces a building warmth that is present throughout the dish. The dish does not traditionally include dried chilies or chili paste as written here. It is warm rather than spicy, accessible to people who enjoy ginger but are sensitive to chili heat.
What mushrooms are used in Thai ginger chicken?
Wood ear mushrooms, also called black fungus or cloud ear fungus, are traditional in Thai ginger chicken. They are sold dried at Asian grocery stores and need twenty minutes of soaking in warm water before use. Their slightly chewy texture and neutral flavor make them ideal for this dish. Fresh shiitake mushrooms are the best substitute. Button mushrooms work but produce a softer, less interesting result.